
Sunflower Painting Demonstration

Stage One
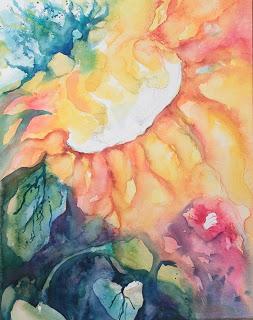
The first washes are applied to a partially wet board. The colours I'm using for stage one are Transparent yellow, Cobalt Blue, Viridian Green and Permanent Rose.
Stretching the Paper
This Sunflower painting is done on Langton Watercolour paper, size 20" x 16 ". I stretched the paper onto a board to avoid buckling. I always do this as I like to use a lot of water.
Drawing the Sunflower
I drew the basic shape of the sunflower with Faber Castell watercolour sticks. These are basically pigments in a stick, that dissolve on contact with water.

When drawing it is important to remember to keep the lines flowing. Stand up to do this, and use the arm from the shoulder to avoid getting a cramped up little drawing that you keep having to erase. It is daunting when faced with the bare white of the paper, but if you put on some music, and do some practice runs with a sheet of inexpensive paper (or newspaper) you can get the flow going. Remember, these watercolour crayons will disolve when you put the first washes down, so any lines made are infinitely mobile and always forgiving :-)
Laying down the first Wash
This can be a bit daunting, but there's no escaping the fact that I just have to get in there and go for it. I use a no 18 brush, with full loads of colour. I apply the colour directly to dry paper. This keeps the intensity. I will be applying water directly beside areas of full colour, so the paint will run and give interesting effects. I will also be creating areas, that when sprayed lightly with water or alcohol, will give an interesting texture. If you put a wash on wet paper then the whole thing will fade out and look insipid. I have used the smallest amount of underspray on the top-left-hand corner of the painting where the spiky leaves will be as this is the lightest area of the painting, so I want the effect to be soft and broken. (I will show a close up of these techniques in the follow up).
I started with the yellows first (see earlier blog entry for the list of colours), alternating between light and dark yellow with a touch of orange added in. I left some very light areas for highlights on the petals but didn't get too fussy as I will be lifting out more light areas when this first stage is dry. I suggested leaves with blues and greens in the lower right of the painting. I added a big dash of pink (permanent rose) for no other reason than I really wanted to see pink next to the orange. I just love these two colours together and they remind me very much of my Indian days.
Sunflower Demonstration Stage 2
Stage Two
The first wash has dried and I am lifting out areas with a damp brush to make some lighter tones within the petals. I'm also defining some areas with splashes and runs of paint to suggest the veins in the giant leaves.
This is often the hardest part of the painting to step back into. The initial wash is dry. Some areas look lovely and soft and swirly, and some look so exciting that you don't want to mess with them...they're just perfect the way they are. But at this stage the painting has no form.
What is required is to look at the different effects that have been made in the earlier wash, and enhance or highlight these areas while bringing up the shapes and forms of the flower.
I start working on the texture of the yellow petals with cadmium yellow and cadmium orange. What I'm aiming to do is add substance while outlining some of the petals. The underlying watercolour crayon will have added some texture already. I added permanent rose and perelyne maroon to the gaps between the petals and I let the paint run, sometimes tilting the board to add the effect of gravity. I started painting darker areas behind the leaves too, so the first wash shows up as a highlight. I also dropped some splashes of ultramarine blue on the pale leaf shapes and forced the blobs to run by blowing them with a straw. This is great for getting spontaneous lines which look like the veins on the leaves. In the background darks I spattered and sprayed with both paint and alcohol to give a mottled texture. One thing I like to do is to add many layers of paint. With watercolour you can be quite bold and add as many layers as you like, so long as you wait for each layer to dry and use a good quality translucent paint with good quality paper. (Remember not to add white as this will muddy the effects).
This part of the painting establishes the basic shapes. The overlay can look a bit awkward and rough until I wait for this second layer of paint to dry and I can start to merge the first layer with the second by softly smudging the hard edges of the second wash. This, I think, is where the experience comes in and it can often take quite a bit of time to go over each area. I will take my time doing this and pick out highlights with an old brush which is first made wet with clean water, blotted on a painting cloth, and then used to softly scrub some of the paint off to reveal a lighter underpainting. I wash the brush frequently with clean water to keep the layers fresh. When I'm happy that the petals look soft, and the shapes blend well and fit together as part of a whole, I move onto the next stage.
Sunflower Demonstration Stage 3

Stage Three
This stage fills in the darks and I practice some negative painting - that is painting the dark shapes in behind the light petals. It gives the sunflower a whole lot more definition and graphic design.
Painting the Darks
This stage is where the whole balance of the painting comes together. It is time to paint the centre of the flower head. I use strong washes of ultramarine blue, alizarin crimson and perelyne red in the following way...beside the petals I start with the blue and as I work my way to the centre of the flower I make the mix more red/purple. After letting this dry a little, I drop some water back into the wash to make some backruns. This adds highlights as well as volume and texture to the wash. I also spray some paint in there to vary the colour. Spraying with a toothbrush loaded with paint will give a fine spatter, while a brush flicked against the side of a palette knife will give larger, more random marks.
When the sunflower centre is dry I start to strengthen the shapes of the petals even more by accentuating where they meet the flower head. Some spattering is done also on the leaves, and I may do several layers, as well as spraying with some water to keep on adding the layers. It is important to work on the painting as a whole so it looks well balanced.
Sunflower Demonstration Stage Four

Stage Four
The last part is done when the painting is completely dry. I add spatters of white gouache paint and gold ink to soften the dark areas and give the flower an ethereal look.
Adding the surface detail to the Sunflower
The previous stage showed the sunflower in all its glory but it was still a little rough looking. This final stage just dots the "i's" and crosses the "t's". The underwork is all done; the textures all added...what more could the painting need? I think this is my favourite part. I do more intricate spattering with gouache (opaque paint) and gold ink. I also lift out some areas in the sunflower centre which gives the impression of seeds, but in a stylized way. The opaque paint added at this time gives the impression of small jewels. (You will remember I cautioned against using opaque paint earlier...but this is completely different here. It is added only onto a dry area, and no mixing with the underpainting occurs). I also add some painted gold areas to accentuate some of the petals. It gives a designed effect to the overall look of the completed painting. And there we are....
If you'd like to have a look at this in fast motion (I know some people hate to read!) then here's one I prepared earlier!